When I’m knitting other designers’ patterns, I very often end in the dilemma of my gauge not matching the pattern (but having the perfect drape and feel), or the yarn I want to use not being the right weight. It’s silly, I know – I could change yarns or needles or something, but very often I don’t want to. What to do, then?
Well, sometimes I recalculate. But often, there is a pretty simple way of “altering” the pattern, which I’d like to share with you!
I have an example of a project I did a while ago: The Fuse cardigan by Veronik Avery.
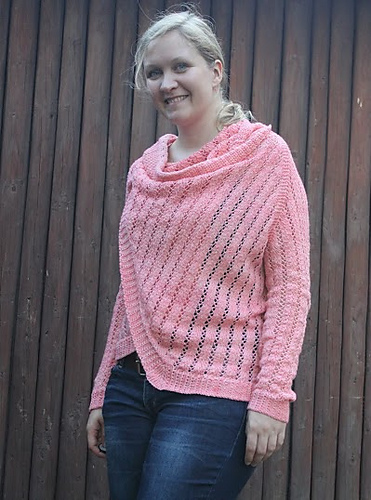
It is originally done in worsted weight yarn on a 5,5 mm / US 9 needle, but I just had this perfect yarn in fingering weight. Also, I didn’t really want a chunky cardigan, but instead more of a light weight one. Using fingering weight yarn on those large needles would make the cardi way too floppy and loose though, so I decided to work on 4 m / US 6 needles instead.
You can probably guess that if I just made my regular size (size M/37″ bust), I would end up with a much smaller garment. When you work on smaller needles and with thinner yarn, your gauge becomes tighter, so it takes more stitches per 10 cm / 4 inches.
The golden rule of (stitch) gauge:
More sts on 10 cm -> tighter gauge, smaller item. Often worked on smaller needles.
Less sts on 10 cm -> looser gauge, bigger item. Often worked on bigger needles.
As my gauge would be tighter (smaller needles + thinner yarn = more sts per 10 cm/4″), I could either choose to recalculate everything (!), or choose to make a bigger size to compensate for the missing width of the fabric. The last option is most likely the most appealing to everyone, isn’t it?
Use the below form to calculate which size you should make, based on the numbers for your gauge, the pattern gauge, and your chest/bust circumference:
How I went about determining the size I should knit:
Step 1: I made a swatch!
I know this seems like a huge hurdle for some, as most people just want to get on with knitting the actual garment. However, for garments especially, your gauge really is important. See the golden rule of gauge above! If the pattern says 10 sts per 10 cm/4″, and your gauge is 14 sts per 10 cm/4″, the number of stitches cast on will become a smaller item than if you had a gauge of 10 sts per 10 cm/4″.
Also: Make sure to wash and block your swatch before you measure the final gauge. Gauge can change in washing, depending on how you treat it and what the fiber content of the yarn is. Treat your swatch the same way as you will be treating the finished garment!
So, I made that swatch using fingering weight yarn and 4 mm / US 6 needles.
The pattern called for a gauge of 14,5 sts & 25,5 rows, my gauge was 20 sts & 35 rows.
Step 2: Calculating the gauge difference
In order to calculate the stitch gauge difference between the two, I did this calculation:
my gauge / pattern gauge = difference in gauge (the number of sts in my gauge needed to work 1 st in the pattern gauge)
20 / 14,5 = 1,38
Step 3: Calculating the needed size
If I went by the bust size alone, the size I would need (37″) would correspond to:
My size * gauge difference = size I need to work by
38″*1,38 = 52,5″.
So yes, I would need to work the size that corresponded to a bust size of 52,5″.
The pattern’s biggest size was 53″, so that made it clear – that was the size I needed to make! It turned out quite alright, didn’t it?
Pitfalls
HOWEVER, this method only works if you have an overview over the pattern and understanding of the garment construction. It’s absolutely the easiest for straight top down or bottom up sweaters and other items, but as soon as they’re worked on the bias (or using other funky techniques) you risk getting in a pickle. I’m not saying it’s impossible, but it depends wholly on the item in question!
A couple of things to note:
- The above method with size change is for horizontal calculations only (stitch count).
- You can do the same for vertical calculations (row count), but make sure to consider the differences that might occur. I was so lucky to have my row gauge vs. the pattern row gauge be the same percentage in difference as the stitch gauge, but that might not always be the case.
- When working on something like a sweater, very often it will say to work to a certain measurement. Use that measurement instead of counting rows!
- The garment I did this on had a lot of positive ease. I ended up with less positive ease than was recommended (me: 1″, recommended: 6″), as really the size matching a 53″ bust would have needed to be 59″ (but the pattern only went up to 53″). It was no issue here, but it might be in a more fitted garment!
I hope this post has been helpful!